Showing posts with label DIY. Show all posts

Thursday, July 31, 2014

Cosplay 101: Daenerys Eyebrow Tutorial

Daenerys Targaryen Eyebrow Tutorial

Aside from her white-blonde hair, Daenerys' most identifying feature is her dark eyebrows. Even before I watched Game of Thrones, I could recognize Dany cosplayers by their hair and eyebrows!

When I worked on my first Daenerys cosplay, I realized that her eyebrows are one of the biggest keys to looking more like her in costume. I'm a beginner at makeup, so even though I've learned a lot about makeup since I started cosplay, modifying my eyebrows to look more like a real person's seemed intimidating. 

Daenerys Targaryen Eyebrow Tutorial

Luckily, I'm close friends with Liz, who is fantastic at makeup. She's done my Dany eyebrows for me each time I've cosplayed Daenerys so far. I've had a few people ask how she did it, so I wanted to share a quick tutorial with you to achieve Khaleesi-status brows.

I gathered lots of reference photos and noticed that while Dany has thick, natural-looking brows, they are fairly well-groomed. With almost no stray hairs, they are definitely shaped through plucking or waxing. In addition, Dany's eyebrows have almost no arch.

Daenerys Targaryen Eyebrow Tutorial
#NoMakeup! Just kidding, I'm wearing a ton of makeup.

My own eyebrows are pretty sparse, but luckily that's easy to fix with makeup. I have almost no arch to my brows, and the overall shape is pretty similar to Emilia Clarke's eyebrows, just thinner/sparser. I actually grew my eyebrows out a little bit for my Daenerys cosplay so they'd be a little thicker (and look less drawn on).

If you have thicker eyebrows, you can either shape them to the same shape or use the glue stick trick to cover them up.

Daenerys Targaryen Eyebrow Tutorial
Half on, half off - the power of makeup!
Liz used Anastasia Beverley Hills Brow Wiz  in Ebony to fill in my eyebrows. Brow Wiz is basically a mechanical eyebrow pencil that's super simple to use. Liz did a light outline of the shape she wanted, then filled the shape in the direction of my eyebrow hair. Finally, Liz used the brush end of Brow Wiz to comb the color through.

The most crucial part is getting the shape right, so use really light strokes until you get the shape you want. For Dany's straight eyebrows, start with the straightest line at the bottom of your natural brow. Follow the same line for the top of your brows. Try to keep the arch minimized. Look in the mirror and refer to your reference images frequently to make sure you're on the right track!
Daenerys Targaryen Eyebrow Tutorial
Khaleesi brows complete!
Since this makeup is for photographs, I like to go a little bit darker than Emilia's natural eyebrows so it will show up better on camera. The general rule of thumb for cosplay makeup is to go at least 10% heavier than you would normally.

And there you have it! With a little practice, you too can have Daenerys eyebrows.

Have you ever re-shaped your eyebrows for cosplay or otherwise?


Thursday, March 27, 2014

Cosplay 101: Basic Wig Guide (Part 2)

Cosplay 101: Basic Wig Guide
Cosplayers: Liz as LSP, Peony as PB

Part one of the Wig Guide covers why wigs are integral to cosplay, basic wig terminology, choosing wigs, and types of wigs. Today, let's continue on to wig styling, wearing a wig, and wig storage techniques! After reading both parts of this guide, you should master wig basics!

And don't forget to browse the Cosplay 101 tag for more cosplay tutorials and discussions.

I'm about halfway through with my Mami Tomoe wig! Here's what I started with... #cosplay #cosplayprogress
Materials to style my Mami Tomoe wig.

Wig Styling Basics

Cosplay wigs these days are so much more accessible than even 5 years ago. With a wider selection of styles and colors, it's simpler to find a wig close to your character's hair. That being said, almost every wig looks better with a little styling rather than wearing it straight out of the bag. Spend the extra 10 minutes to make your wig look better, even if the style seems perfect, and you'll notice the difference it makes.
  • Trim the bangs to fit your face. Most of the time, wig bangs will be a little too long. Trim them to fit your face and they will look so much better! Cutting bangs is one of the easiest techniques to learn - here's a YouTube tutorial from Arda that explains it well!
  • Thin out too-thick wigs. If your wig makes your head look like a mushroom, you may benefit from trimming the bulk. I used this tutorial to get an idea of how to do it.
  • Add a little styling product. Depending on your character's style, you may want to add some hairspray, tease the wig to make it bigger in some places, or add a little product to make the bangs spiky. (I used a little hairspray to keep Ramona's bangs, below, in the arrangement they are in!)
  • Style curls and waves. There are a few methods to curling a wig, and luckily they are all pretty simple! I usually use foam rollers and heat or water, similar to this tutorial.


Ramona Flowers Volume 5 Cover - Ikkicon 2013
Photo: Filmshooter

Wearing a Wig

For those of you who have had itchy, sweaty, miserable wig experiences, listen up! The quality of the wig you buy matters, but I have a few hints that could help you too.

I consider wig caps absolutely essential to cosplay. They will hide all your stray hairs and keep your hair organized and hidden away underneath your wig. There are two styles - mesh and nylon. I tend to use nylon caps because I think they squish my hair down flatter and are neater, but some people prefer mesh caps, which are more breathable. Either way, try to get a wig cap that will blend under your wig - don't wear a black cap underneath a white wig!

Another tip I have for wearing a wig comfortably is arranging your hair evenly under your wig cap. I usually do maiden braids because they won't make a big lump underneath the wig, like a ponytail or bun would. Plus, when I take my hair out of the wig, sometimes it looks decent. Friends of mine like to do pincurl-style pins or bunch of tiny pinned braids - it's up to your preference! This will ensure that the wig sits evenly and comfortably on your head.

Some wigs are too heavy and will try to slip off your head - ponytail wigs are especially guilty of this. The remedy is simple - sew a few wig clips at the front of your wig, where the wig meets your forehead. This will keep your wig in one place!

One final note - be sure you adjust your wig so it fits comfortably, but not too loosely, on your head. Many quality wigs will have hooks on the backside of the wig itself (you can see an example here to get a visual).

Ramona Flowers


Wig Storage

When you are done wearing your wig, make sure you store it properly to keep it in good shape. I'd recommend de-tangling your wig after each time you wear it (although, admittedly, I don't do it every single time, only when it's needed).

For straight or wavy wigs, simply use a wide-toothed comb or your fingers to comb through the wig from the bottom up. Be very gentle and work out any knots slowly. For longer wigs, keep them braided when not in use so the fibers don't get tangled within storage. For curly wigs, it's a little bit different - you'll have to comb each ringlet separately, then wrap it around your finger to bounce the curl back to its shape. As usual, Arda has a wonderful tutorial showing this process.

Next, most wigs can stay in the plastic zip-lock bag they arrived in. This will keep it out of the way and free from dust. I tend to keep the bags open and keep all my wigs in a big tub. It's relatively easy to find the one I need since the bags are clear. If your wig is heavily styled, however, it might be better to leave it on a wig head. 

Wig Sources

I included it in the first part, but here it is again in case you missed it - my favorite sources for wigs! Now more than ever, wigs of all kinds are easy to buy online. 

And there you go! That's everything you need to know, from choosing the correct wig to keeping it stored properly. I hope this is helpful and serves as a good reference for you. I have plenty of other wiggy topics to delve into later, but I want to know -

What do you want to see on Cosplay 101 next?


Friday, November 15, 2013

DIY: How to Make a Flower Crown or Headband

When I made my flower/leaf crown for my deer girl Halloween costume, I took a few photos along the way to show the process! Making your own flower headband is really easy - it probably took me 10 minutes and only requires hot glue skills. (The only thing that didn't work out, actually, was the antlers I made - they just wouldn't stay put and the hot glue melted them. C'est la vie!)

I used this method to make both the crown pictured and the crown I wore in this outfit.

flower crown diy 3

A few more tips... 

  • Use a headband that's the same color as your hair or the flowers you'll be using. I usually use a lighter one since I'm blonde, but I picked brown this time since I knew I'd be in a darker wig for this costume. 
  • If you can, use a wig head! It's so much easier to see how end result with a styrofoam head to work on.
  • Use the scissors to cut the canvas mesh and trim the flowers/other accents to the height you want them.
  • Arrange your pieces BEFORE you glue them!
  • Play around with angles to see which way you want your flowers. Some look better when glued facing up from the crown, rather than straight.

If you make a crown, show me photos! I'd love to see how it turns out!


Wednesday, May 1, 2013

Cosplay 101: Detangling a Cosplay Wig

COSPLAY 101: De-tangling a Cosplay Wig

Today I'm going to share a technique I used on my poor, neglected wig to get all the knots and tangles out. This wig was my very first one, from Arda, and sadly, I didn't know anything about wig care at the time. After wearing it, I didn't put it nicely back in the bag or comb through it to eliminate tangles, and after a while, it was just a knotty mess! I'd finger comb it before I wore it, but realized that it was far too tangled to wear anymore.

COSPLAY 101: How to de-tangle a cosplay wig
I'm almost embarrassed to show the before photos, my wig was in awful shape!
I found this post floating around Tumblr, so I decided to use the same method to detangle my wig -- at this point, it was either get a new wig or try something to salvage it. I was pleased with the results and it was really simple to do!

COSPLAY 101: De-tangling a Cosplay Wig
Using a tub that matches your fabric softener is optional.

First, take a capful of fabric softener and mix it with enough water to mostly fill the tub. Flip your wig inside out and swish it gently in the water. Next, let it sit in the tub for a while -- I left mine for about a week. Let it dry on a towel. Once it's dry, comb through with a wig brush or wire brush. If you have a lot of patience, you can also finger-comb through the whole thing, but my wig was too far gone for that.

COSPLAY 101: How to de-tangle a cosplay wig
Ta-da! A like-new smooth, shiny wig!

There was a little bit of shedding during the last step, but overall, my wig looks completely revived! The only issue is that the style in the wig fell out a little bit, but that's easy to fix. I'm so happy this worked for my wig, hope this helped you too!

Do you have any wig care or cosplay questions?

I'd love to do more short cosplay tutorial posts, so ask away!

If you liked this post, let's keep in touch!
Twitter | Instagram | Facebook | Pinterest | Google+

Follow my blog:
Bloglovin' | RSS

Wednesday, July 4, 2012

DIY: Mint Skinny Jeans from Thrifted White Pants

Mint is definitely in right now, and I couldn't be more pleased! I love pastel fashion and pastel colors in general, so being able to purchase them easily is awesome. I've seen mint and lavender skinny jeans around, but I absolutely HATE shopping for jeans. They never fit right and I hate trying on pair after pair only to come out of a store empty handed. I had given up hope on ever finding a pair that I liked and resigned myself to mint nail polish and accessories forever.


Mint

Mint by mia-moore featuring mid heels

While browsing Pinterest, I happened upon this tutorial for how to make your own mint jeans. At first, I wasn't that interested -- until I saw how you can tailor pants to fit like your favorite pair. What?! I decided to give it a shot and I am really pleased with the results.

before textafter text

DIY: Mint Skinny Jeans from Thrifted White Pants


step 1

Step One: Buy White Pants 

If you can find a thrifted pair that already fit you perfectly, great! Skip straight to step four. If not, just aim for a pair that fit your waist. Don't worry about the rest yet. 

I settled for these Nine West jeans pants from Goodwill, since they fit my waist and backside well.

step two
Step two b


Step Two: Pin and Sew to Skinny Your Jeans

Turn the white pants inside out. Using a pair of jeans that already fit you well, line up both pairs of pants on the outside of the pant leg. Pin the white pants on the inside. You can pin them together, like I did, or just pin the white pants. Whichever works for you! Sew a straight line by following the line you've made with the pins all the way down.

step 3


Step Three: Try on for Fit

This photo feels really Myspace, but we don't have a full-length mirror anywhere else in the apartment :)


Make sure your pants fit! I messed up a part of my pants so I had to seam rip and redo. Once they fit, cut off the excess fabric from the inside of the pants.


step 4

Step Four: Dye 

step 4 a


Follow the directions on your dye bottle. I used Tulip Green Vert, recommended by the tutorial linked to above. Some people were having a hard time finding the right color, so I took a picture of the bottle I used. I found it at Michael's, but it is probably available at any craft or hobby store.

As per the instructions, I added half the bottle to a washing machine full of hot water, then half a cup of salt and the pants, and stirred for 10 minutes. Check up on the color every now and then to make sure it's not too dark. Empty your washer, then run the pants on a cold cycle without soap. Hang dry or run them through the dryer.


That's it! Now you have cute, tailored mint skinny jeans!


Minty Fresh


That was way easier than I expected and I'm really excited to wear mine! I don't usually wear pants, but these are nice and comfortable and match so much of my closet.

If you give this a shot, please let me know and show me the end result in the comments! I'd love to see how yours turn out. 

Tuesday, June 12, 2012

DIY: How to Make an Asymmetrical Skirt

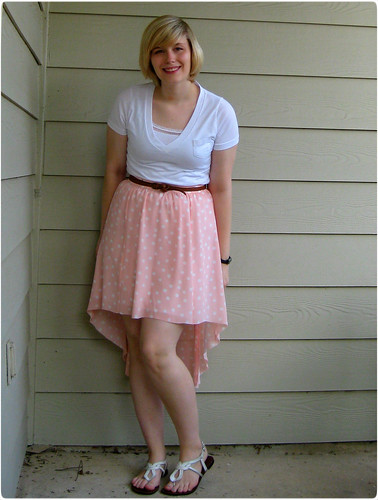
I know these as high-low skirts, but apparently most people call them asymmetrical skirts. I've also heard waterfall or mullet -- the last name is probably my favorite. Whatever you want to call them, I've lusted after these skirts since they first came in style, but I had no idea how I would wear it and I certainly didn't want to drop big bucks on a skirt that would only be in style for a season or two. Nevertheless, I kept my eyes out for a cute, affordable one so I could take part in the asymmetrical skirt trend.

Asymmetrical Skirts

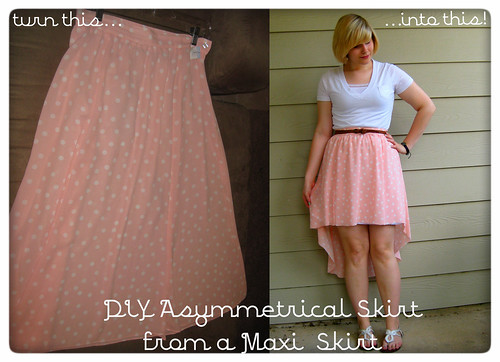
Yesterday, when I was walking around Goodwill, lamenting a cutely-patterned but ultimately ugly maxi skirt, I was hit with a brilliant idea -- maybe I could turn it into a mullet skirt myself. $7.99 and a couple of internet searches later, I combined a few methods and voila! soon created my first high-low skirt. Luckily, it was pretty simple (and only took about 15 minutes!) so I'll share it with you.
DIY Asymmetrical Skirt

DIY: Asymmetrical Skirt from a Maxi Skirt


DIY Asymmetrical Skirt: Step One

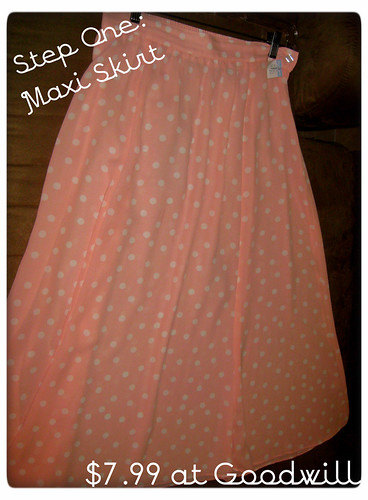
Step One: Choose your Maxi Skirt

I bought this lovely pink polka dotted one at Goodwill, but you could also use one you have lying around to try and breathe new life into it. Pleated maxi skirts turn into beautiful asymmetrical skirts.
DIY Asymmetrical Skirt: Step Two

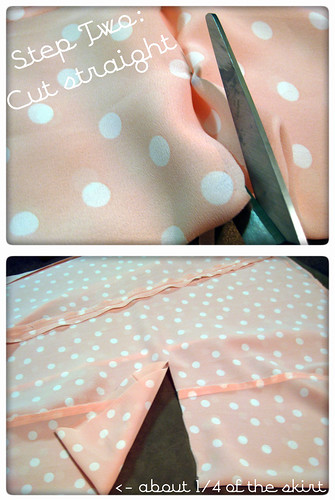
Step Two: Cut a Straight Line

Measure where you want the shortest part of the skirt to hit. I used another skirt that is flattering on me as a guide, but you could also use a measuring tape. I also pinned mine up to see before I made the first cut. Remember, you can always cut more, but you can't add fabric back. Better to cut too little and have to adjust than to ruin your skirt by cutting way too much off.

Once you have measured where to cut the skirt, fold the skirt in half at the front, so that the edges are the middle of the front and back of the skirt. This part is a little confusing, but basically, we want to make sure the skirt is even on both sides, so fold it on its side. Cut straight about 1/4 of the way into the skirt. This should be the front side of the skirt.

DIY Asymmetrical Skirt: Step Three

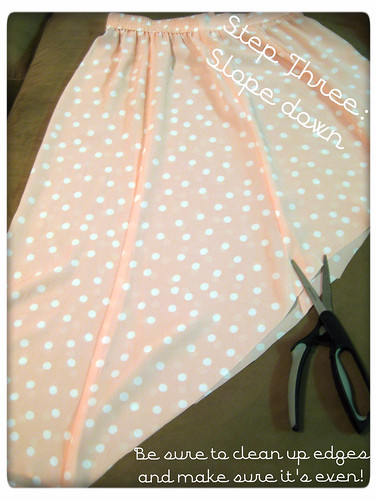
Step Three: Slope Downward

From now till the end of the skirt, slope downward. I didn't use any guide or measurements and I think my skirt came out fabulous! Make sure to go back to clean up and ensure that each side is evenly cut. As you can see in this picture, my skirt was not quite even yet. Try to cut as smoothly as possible -- no jagged edges!

Step Four: Seal the Edges with a Lighter

Okay, I know this sounds crazy, but trust me here. Everything I read said that hemming the skirt would weigh it down too much, ruining the waterfall-like effect of the skirt and being obvious due to the sheerness of the fabric. A solution? Seal the edges of the skirt with a lighter! Be careful not to hurt yourself and be sure to move quickly, otherwise you risk burning your skirt. Now, the edges won't fray.

Ta-da! Quick, simple, and now you have a new mullet skirt!


Mermaid Skirt

How to Wear an Asymmetrical Skirt: Quick Tips

  • These skirts are great for showing off cute shoes. Heels work best, but even if you're not a heels girl (like myself), these skirts will definitely draw attention to your feet.
  • Try wearing the highest part on your side instead of directly in the front for a fun twist.
  • Mix it up in the winter by pairing your skirt with tights and boots.
  • Patterned and pleated hi-low skirts are a little dressier than plain-colored skirts, so choose accordingly!

Let me know if you found this tutorial useful in the comments section. If you make your own skirt, I'd love to see a picture!

Related Posts Plugin for WordPress, Blogger...